Lightroom offers simple solutions for exporting your images to share on social media platforms like Instagram and Facebook.
Maybe you're hither because yous've had your favorite photos converted into pixellated garbage after uploading them to Instagram. Peradventure you lot feel similar it takes besides long to adjust your settings for print vs. sharing your photos online. Any the case, we can tell you right up front that dialing in your Lightroom consign settings for Instagram and Facebook in accelerate will streamline your image sharing process and keep your photo quality up to par.
The best part is y'all can save your export settings as presets and fifty-fifty link to a scheduling app to further increase your workflow efficiency.
This tutorial is part of our Lightroom Tips Series, where we requite y'all simple guidance on how to use Lightroom more than efficiently and finer.
Steps for Dialing in Lightroom Export Settings for Instagram and Facebook
These steps should exist followed AFTER you've edited your photos in Lightroom. You can observe a couple of bonus tips in the section beneath (toward the stop of the article) regarding crop size and other factors that can be addressed while editing in Lightroom'due south Develop module.
Step 1 – Open the Consign Dialog
After y'all've selected the photos you desire to export, open up the export dialog, which you lot can practice one of 2 means:
- Printing CTRL+Shift+E (Windows) or CMD+Shift+E (Mac)
- Right click over the selected images and choose "Export"
Pace 2 – Select Export Location
When the Consign Dialog box opens, you'll observe a dropdown menu just higher up the "Consign Location" section; you can choose to export the images to your hard drive, email, or CD/DVD. The choice is yours, merely for the purpose of this article (getting our images fix for Instagram and Facebook), nosotros recommend selecting your hard drive.
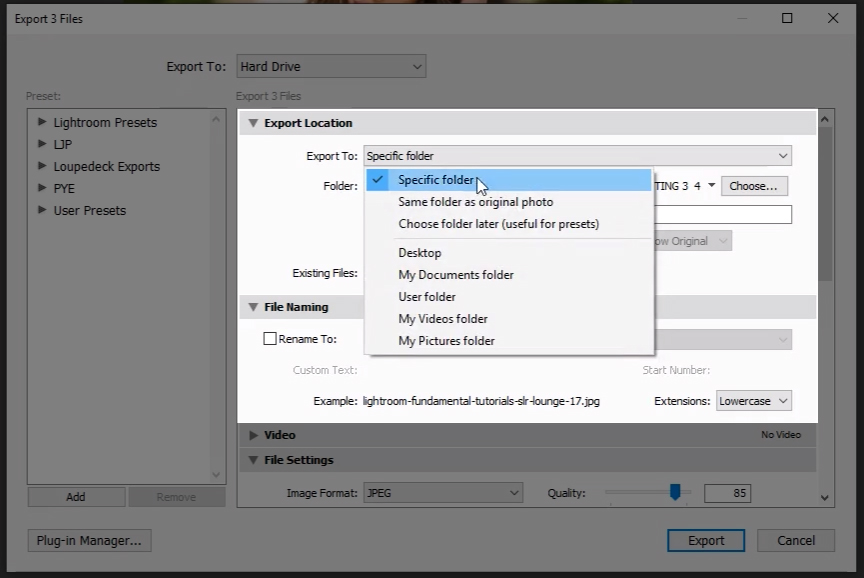
2a. Choose the Specific Binder Choice
Side by side, you'll take the option of exporting your images to a specific binder or the desktop, among others. The ideal pick is to save to a specific folder every bit information technology volition show useful in later steps for creating your ain export presets.
2b. Create and Name a New Export Folder
We're going to fix a binder arrangement for exporting images to different locations, so we need to start with a general folder that will firm other subfolders used for exporting images for impress, Instagram, and Facebook.
Choose "Export to: Specific Folder" and so open the driblet downwardly menu to create the folder on your desktop (or other handy location). After you've named the folder, hit the "Select Binder" button in the lower right corner.
2C. Create and Name a New Sub Folder
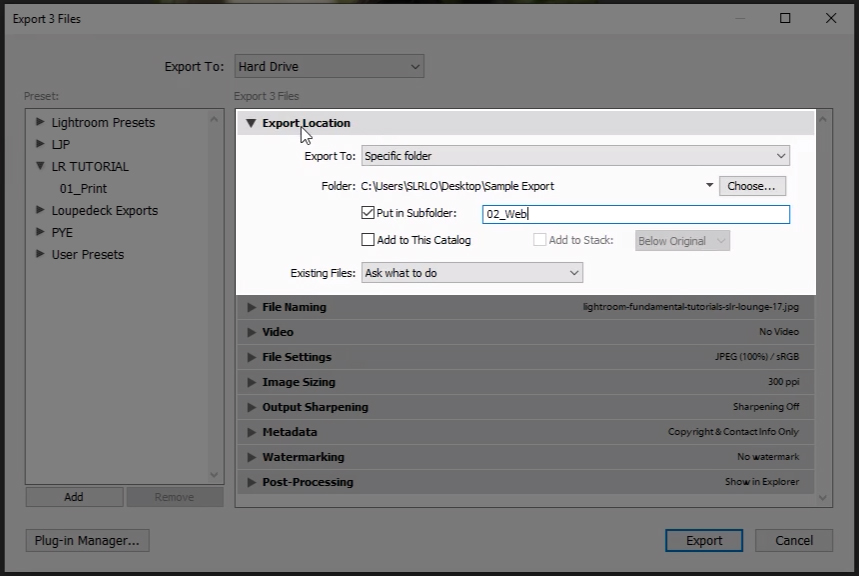
Check the "Put in Sub Binder" checkbox and name a new sub folder. Name this binder something similar "01_Instagram."
- Y'all'll also encounter a checkbox that says "Add to This Catalog," but we generally avert this option as information technology will create indistinguishable files in the itemize.
- Finally, select the "Ask What to Do" option in the Existing Files dropdown bill of fare to avoid accidentally losing or misplacing files.
Step iii – Rename the Photos
If you and then desire, you tin add a suffix like "_IG" to the file names in this first sub folder to clearly identify your Instagram-leap images. To practice this, click on the "File Rename" checkbox in the File Naming section of the Export Dialog box.
Usually, we prefer renaming files inside of Lightroom and keeping those names when they're exported so that the exported file names match those in the Lightroom catalog. That said, we tend to Not select the "Rename To" box in the Consign Dialog box. This will vary based on your personal preference.
Footstep 4 – Choose Your File Settings
4a. Paradigm Format & Color Space
You can create several types of images, but for the purposes of this tutorial, we recommend selecting the "JPEG" option for prototype format and "sRGB" for your color infinite. These recommendations come based on the general preference for most spider web-based applications.
4b. Adjust the Quality Slider to Select Image Quality
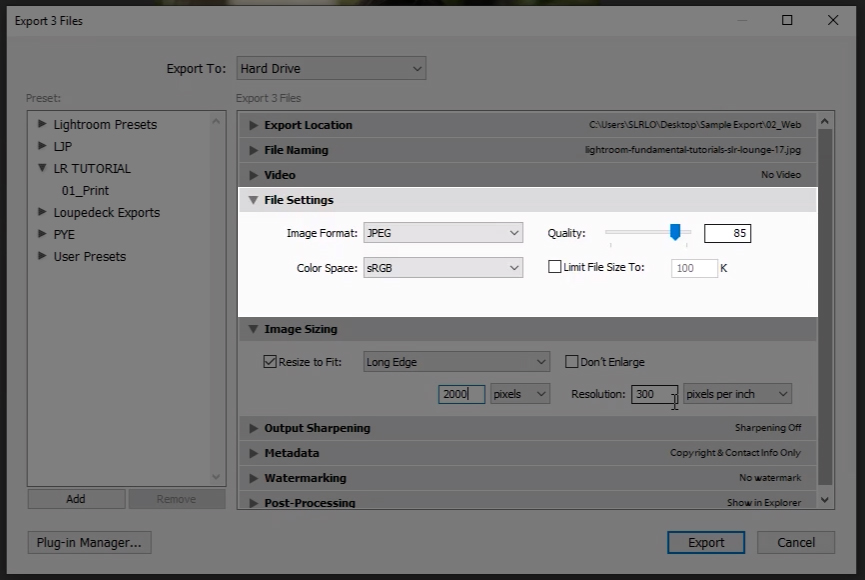
When you accommodate the quality slider, you are also adjusting the size of the file. The higher the quality you select, the larger the file size, and vice versa. Yous'll find unlike preferences across the web for this setting, but nosotros recommend not going below 76% to strike a nice balance between file size and image quality for posting on Instagram. We typically set our sliders to 85% for online purposes and reserve the 100% setting for when we transport images to print.
Step 5 – Follow Instagram and Facebook Guidelines to Punch In Image Size
Under the Image Sizing section of the Export Dialog box, yous'll have the opportunity to set your image size. Instagram and Facebook each have their ain sizing limitations; if your prototype resolution goes beyond the limits established by Instagram or Facebook, depending on which platform you're posting to, and then the chances of your photo getting compressed (likely into a less-than-flattering version of the original) is practically guaranteed. You lot tin notice the guidelines below:
- Instagram'due south sizing guidelines limit prototype resolution to 1080 pixels wide
- Facebook'south sizing guidelines suggest yous use the following image resolution sizes:
- Regular photos: 720px, 960px or 2048px wide
- Encompass photos: 851px by 315px
- To avoid compression when uploading your cover photo, keep the file size under 100KB
- Bonus: From the Facebook app for iPhone or Android, yous tin can adjust your account settings to always upload photos in HD
Basically, you tin can select the "Resize to Fit" box and adjust the "long border" in pixels, using the recommendations noted above (see paradigm above as well). It'south worth noting that you practise not need to adjust your Resolution (pixels per inch) if you've checked the "Resize to Fit" box.
You lot can ignore the superlative and width and select just 300 (or even 360) pixels per inch under Resolution if yous're sending your images to impress.
See our cropping recommendations under the Additional Tips below.
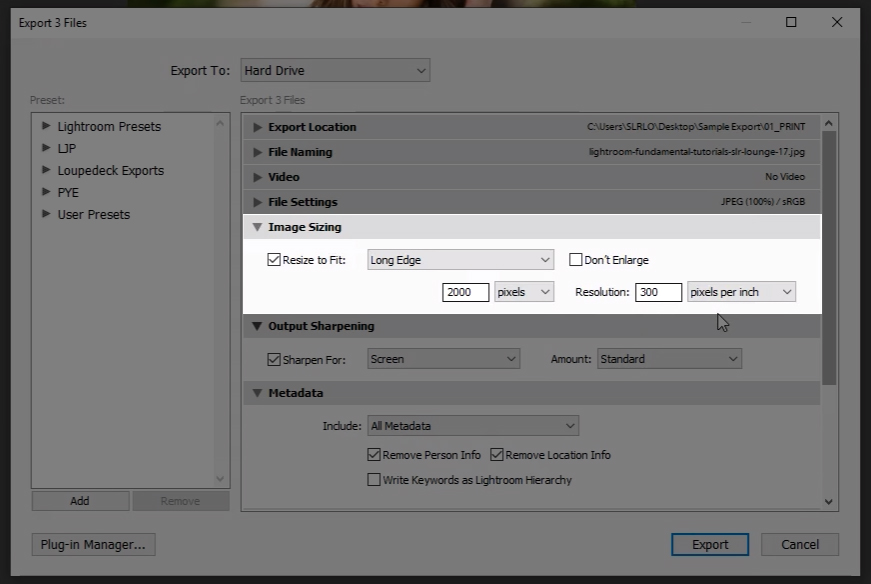
Pace vi – Add Sharpening for Online Applications
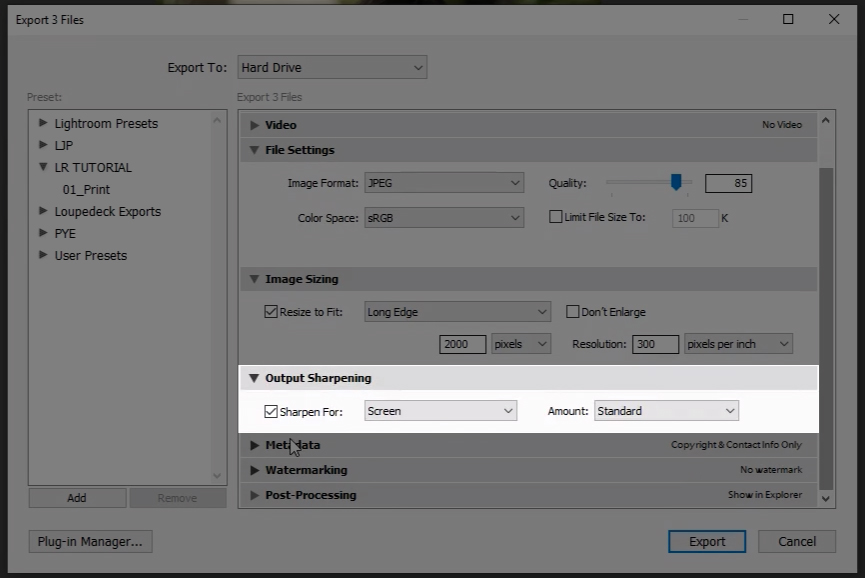
While nosotros wouldn't recommend adding "Output Sharpening" for impress, we DO recommend it for sharing photos on Instagram and Facebook. It simply adds an additional layer of sharpening to whatsoever your settings are later on editing the photo in Lightroom. Nosotros recommend selecting "Screen" and "Standard Amount" when sharing the images online.
Step 7 – Choose Which Metadata to Include
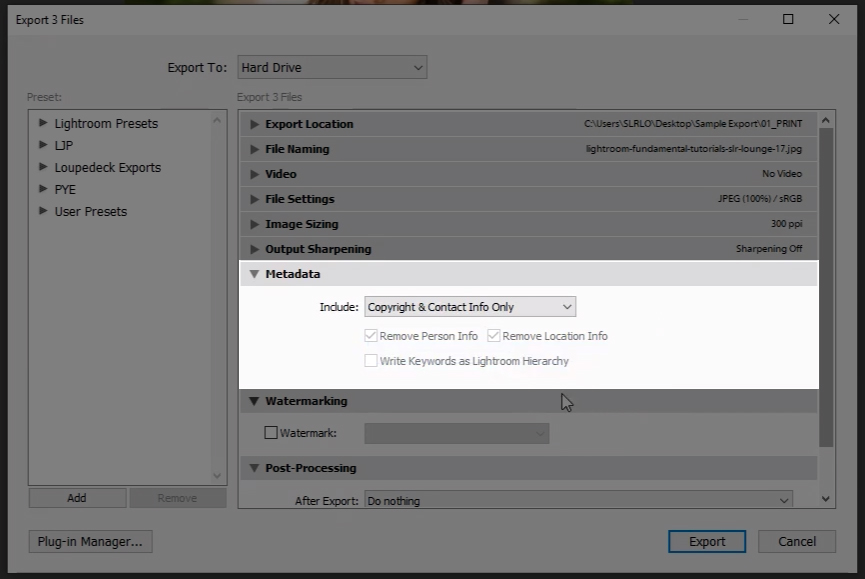
You take several options for selecting various metadata to include within your images, simply we typically select "Copyright & Contact Info Just."
Stride viii – Include (or Practice Not Include) a Watermark
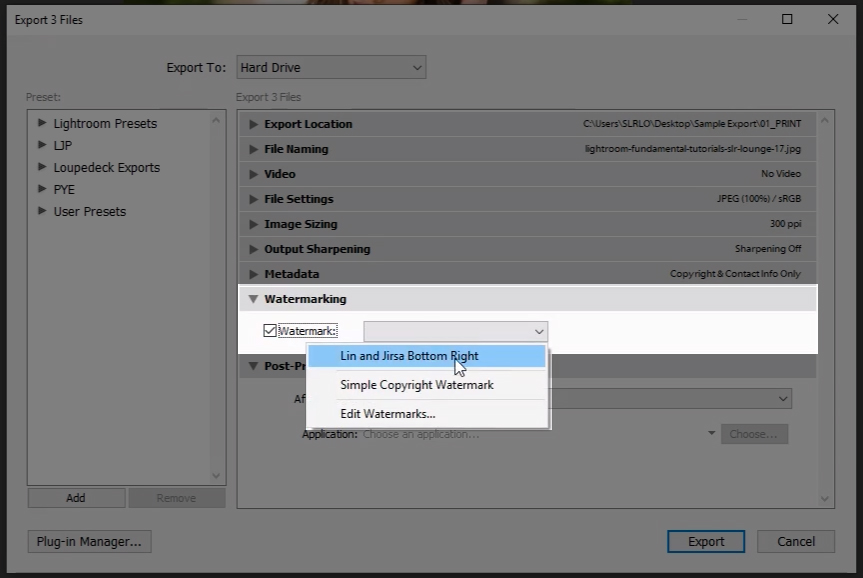
Whether or not you choose to include a watermark is entirely subjective. The only time you would definitely NOT include a watermark is when you lot're sending the image to print; otherwise, it's your phone call. Nosotros typically DO include a watermark when posting to Instagram or Facebook.
If you've never set up a watermark, you can exercise and then by following these steps:
- Select "Edit Watermarks" in the dropdown menu under the "Watermarking" section (see image above). Windows users will need to select "Edit Watermarks" from the Edit menu.
- Choose your watermark type, either "text" or "graphic." If you choose "graphic," yous'll need to upload a graphic that you've prepared in accelerate. Watermarks work all-time with PNG files that accept a transparent groundwork.
- Choose your watermark options from the list presented in Lightroom. These options include size, opacity, location, etc. We recommend experimenting with the various options to see which work all-time for yous.
- Salvage the watermark in Lightroom for nowadays and future use.
- Be sure to select the "Add Watermark" option in the Export Dialog Box to include a watermark if desired.
Step 9 – Cull Post-Processing Options for Actions to Take afterward Export
Lightroom includes several options for what you want to have happen after the file is exported. If you want to do further retouching to the files in Photoshop, for example, y'all can cull the "Open up in Adobe Photoshop CC 2020" option. If you don't want it to do anything, y'all can literally choose "Do Nothing."
Step 10 – Save Your Settings as an Consign Preset
Once yous've finished filling out the various sections of the Consign Dialog Box as described in the steps above, yous tin salvage your settings equally an Consign Preset. To do this, follow the steps below:
10a. Create a New Folder for the Preset Location and Name the Preset
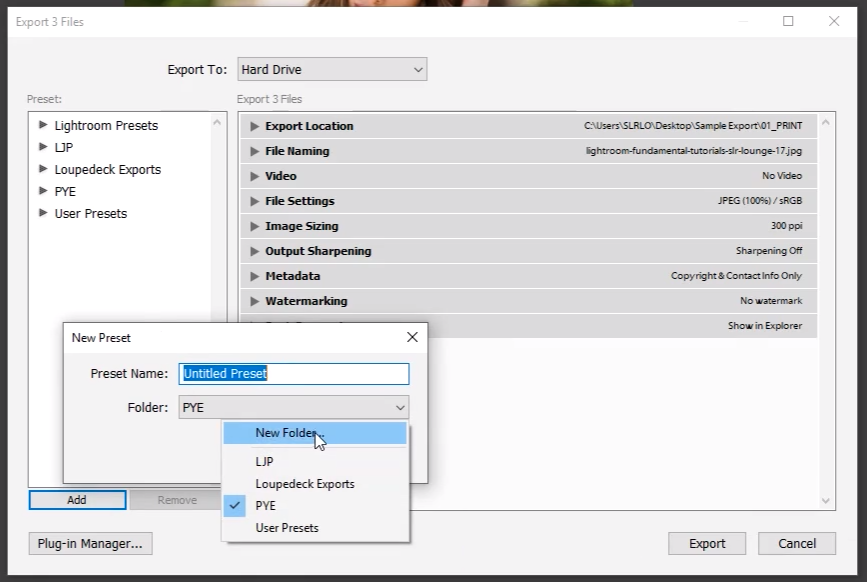
Click on the "Add" button under the "Preset" box and choose "New Folder" under the dropdown carte (see image above). Requite the binder a name. Yous'll As well need to proper name the Preset (something similar "Instagram_Export" should work). You can create a different consign preset for each different setting that you might regularly utilize, such as "Facebook_Cover_Photo" and so on.
10b. Export Your Images
Select "Export" after yous've created a new folder and named your preset. You'll now be able to use this export setting preset for futurity exports. Talk about a time saver!
Additional Tips for Importing and Editing Photos for Instagram and Facebook
Tip 1 – Crop 4×v Vertical
This crop ratio takes up more space on the screen, which allows your photo to occupy the almost real estate on the viewer's device. It's important to note that you lot should ignore this ratio if it does non do your epitome justice. Should you lot choose to use this aspect ratio, however, do so in the Develop module while editing the photograph.
- Select the Ingather Tool in Lightroom
- Select the aspect ratio and choose 4×5 (this volition default to a horizontal layout, just y'all can convert it to a vertical crop by clicking "X" while hovering over the crop overlay tool (see the image beneath)
- Note: Other native Instagram ratios are included below:
- Square – 1:ane (max long side: 1200px)
- Landscape – one.91:1 (max long side: 1080px)
- Versatile – four:iii/iii:iv (max long side: 1200px if portrait or 1080px if landscape)
Tip 2 – Schedule Your Posts in Advance Using a Quality File Transfer Method/Service
When transferring your files, you'll desire to use a method that doesn't shrink the files y'all're transferring. Apple users may prefer to stick with AirDrop while others might go with Dropbox or Google Bulldoze. You lot tin help yourself in two ways at in one case when yous use a scheduling app like Later, Planoly, or Buffer (depending on the destination).
Conclusion
At the stop of the 24-hour interval, social media platforms like Instagram and Facebook volition compress your images to some extent, just by following the steps above, y'all can minimize the destruction and maximize your workflow efficiency.
If you lot use a camera with wi-fi capabilities to wirelessly transfer images to your phone, you tin follow the steps to a higher place on your mobile device and cut out the file transfer from your laptop to your phone or tablet. Our Visual Flow presets, which are also available to use on your phone or tablet, offer yet another fashion to get your photos to the terminal look and ready to post in less time. Learn more than about our Mod Pack and Retouching Toolkit here.
Premium Video Tutorials
You can find our full workshop on Mastering Lightroom here.
DOWNLOAD HERE
Posted by: medeirostining1980.blogspot.com
Post a Comment